

Figure 16: Double the defaults (8GB instead of 4GB) this time around, please.
Ed Tittel / IDG
The next step is to select the Default Switch option for the Connection field under the Configure Networking heading, as shown in Figure 17. Here again, it’s important to note the default is “Not connected,” which means the VM cannot access any networks. Default Switch enables the VM to connect to the networks to which the host PC has access. If you have other switches defined in your host configuration, they should appear in the pull-down menu for this VM setup item (and you’ll be able to use them, if you like).

Figure 17: Use Default Switch if you want the VM to have network (and internet) access.
Ed Tittel / IDG
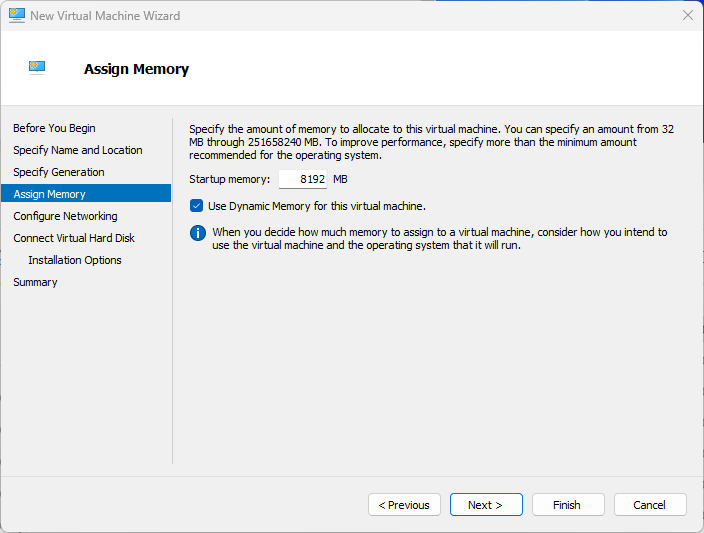
The next step is to connect a virtual hard disk for the VM to use. Here again we’ll use the default location mentioned earlier. Other options include “Use an existing virtual hard disk” (this is how the dev environment described earlier gets its contents) and “Attach a virtual hard disk later” (allows users to otherwise finish configuring a VM without allocating or linking to a virtual hard disk). See Figure 18 for the details for Win11.24H2.vhdx.
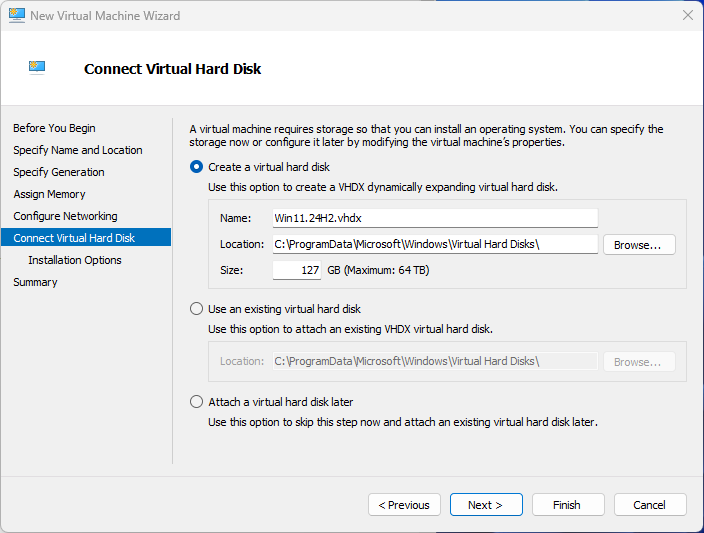
Figure 18: This represents the default allocation (127GB) for Hyper-V VM virtual hard disks.
Ed Tittel / IDG
Next comes the fun part: providing a file system link to an ISO and electing how (or if) to install that image. This reads “Installation Options” on the left-hand side. In this case, we’ll link to the ISO I downloaded from the Insider Preview downloads page, and tell it to install the OS from that file, as shown in Figure 19.
Figure 19: The selected radio button instructs the installer to find a specific Windows 11 ISO file.
Ed Tittel / IDG
At this point, the wizard is finished, so click Summary on the left to show your work so far. It will show all the settings you’ve made. Click Finish to complete the VM creation process. Then, you’ll return to Hyper-V Manager, where you now see a VM named Win11.24H2 in the upper center “Virtual Machines” pane, as shown in Figure 20.
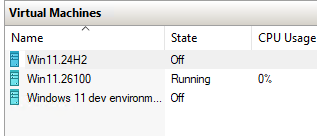
Figure 20: The new VM, Win11.24H2, is turned off. That’s good!
Ed Tittel / IDG
You could try to connect to and start the install process for Win11.24H2 now, but we know one more change is needed — namely, to enable TPM under the new VM’s Security settings, as detailed before Figure 11 above. Once you’ve done so, you can get going on the install for this Windows 11 OS image, as described earlier in this story as well.
We’re done with the introduction to Hyper-V Manager and creating VMs. Now it’s time to dig into some down and dirty details.
A big Hyper-V Manager gotcha: remote VM access
By definition, all VM access is remote — that is, there’s no physical mouse, keyboard, or monitor attached to any VM. To interact with a VM, you must map virtual stuff onto real stuff — including the aforementioned peripherals but also CPUs, RAM, storage, networking, and yadda yadda yadda. Remember further that remote access is one of the benefits of VMs: indeed, they should readily support access across any network connection to a parent hypervisor.
Alas, when a remote connection uses the Windows remote desktop protocol (RDP) through Remote Desktop Connection or the Remote Desktop app, and that hypervisor is Hyper-V, things can get interesting. Let me explain how this can present obstacles above and beyond the gotchas I’ve already mentioned (issues getting the Windows Installer to start up for an ISO-based install, and the need to enable TPM for that install to actually work).
For starters, you can’t start a new Windows 11 VM from inside an RDP session, as it seeks to read and mount the targeted Windows 11 ISO to run its Setup.exe. For whatever odd reason, this works only from a local login on the host PC (not in an RDP session). If you click the Start button shown in Figure 7 in an RDP session, the VM won’t boot to run Setup.exe.
Indeed, if you click Start, you’ll get a black screen in the VM window, instead of running the Windows 11 installer. You must turn off the VM (click Action in the top menu, then click Turn off). Then click the Start button shown in Figure 7 from the physical host PC, using the local mouse or keyboard. Once Setup.exe is running, however, an RDP session shows the VM as you’d expect to see it, with the initial Windows 11 installer screen (see Figure 21).
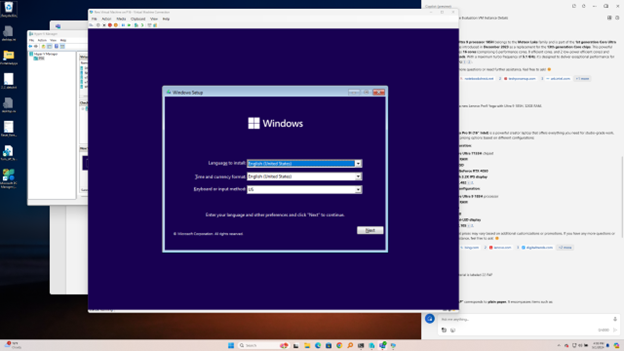
Figure 21: Once Setup.exe is running, you can RDP into the VM, if you wish.
Ed Tittel / IDG
The next gotcha that makes itself felt occurs after you elect the Install now option that appears next. You will find you cannot copy and paste a Windows activation key into the Activate Windows prompt shown in Figure 22. Why? Because this only works in an enhanced session inside RDP, and you can’t elect that option until after Windows 11 is installed. Indeed, fixing this requires some fiddling to the Windows Hello login options. (Turned on by default, they don’t work with an enhanced session that permits copying and pasting from outside the RDP session into that session.)
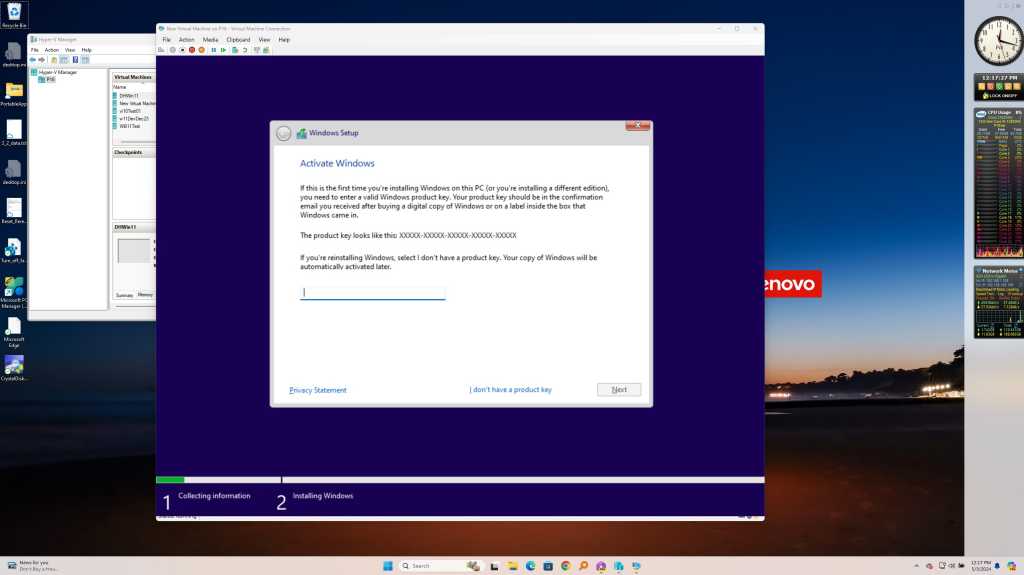
Figure 22: When you get to the key prompt in Activate Windows, you’ll discover you cannot copy and paste a text key. Manual entry only!
Ed Tittel / IDG
You’ll have to enter the 25-character (letters and numbers) string for your chosen Windows key manually. Or you can use the 30-day eval for the Windows 11 developer environment instead (no key required but access doesn’t last very long).
But there’s one more RDP gotcha to surmount: you can’t log in to your new desktop until you uncheck the “Enhanced session” option in the View menu for the RDP session. Once you do that and log in, click Settings > Accounts > Sign-in options, then turn off the toggle under “Additional settings” that reads For improved security…, as shown in Figure 23. Then you can switch back to an enhanced session and log in using a password or a PIN.
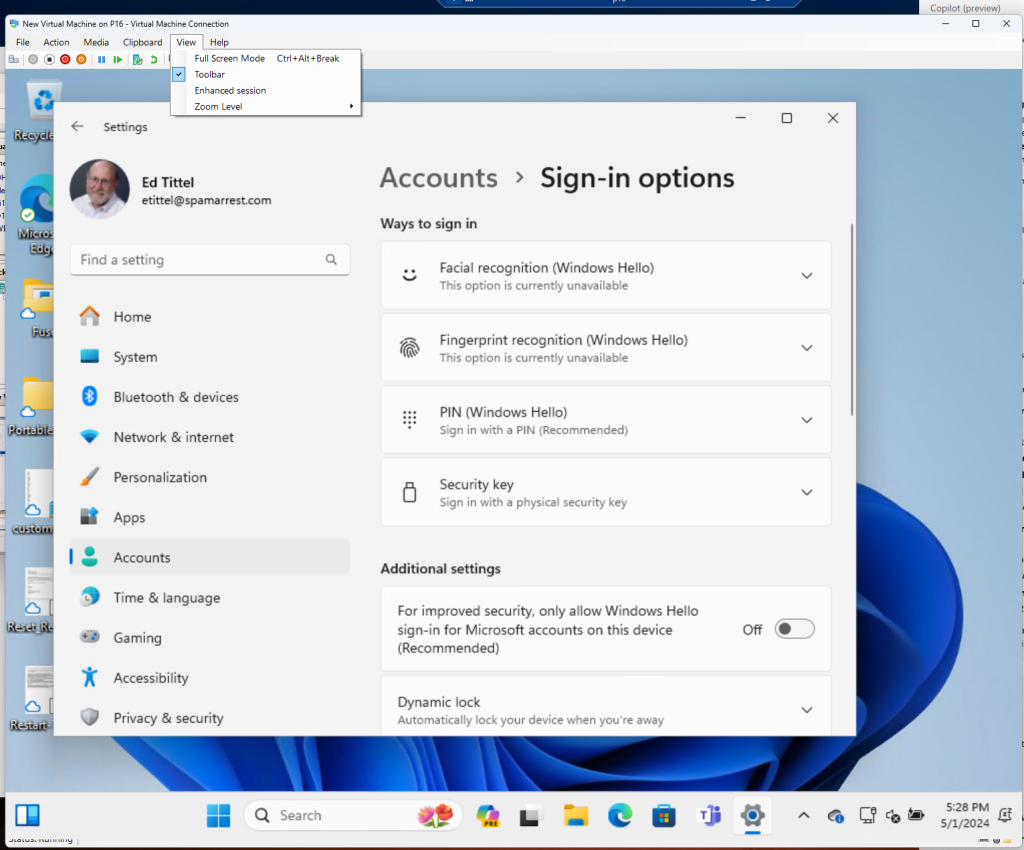
Figure 23: Note that “Enhanced session” in the View menu up top is unchecked. Turn off the toggle under “Additional settings.” Then you can re-enable that option so that cut and paste will work in RDP.
Ed Tittel / IDG
Getting past plain-vanilla VMs
Thanks to our earlier efforts in this story, you’ve got yourself some working Windows 11 VMs set up mostly using Hyper-V Manager’s defaults. By setting up the plain-vanilla, all-default Win11.26100 VM via Quick Create and the slightly modified Win11.24H2 VM that follows it through the New Virtual Machine Wizard, you can learn a lot about what makes a VM tick, as well as provisioning defaults.
Those defaults will change according to the configuration of the host physical PC on which Hyper-V Manager runs. That is, machines with fewer cores, less RAM, and less storage will produce default VMs with fewer cores, less RAM, and less storage than those machines with more cores, more RAM and more storage, like the formidable Lenovo P16 Mobile Workstation I used as my test machine, with 24 cores, 64GB RAM, and ~4 TB total storage, 2 TB on the boot/system drive.
In most cases, the defaults that Hyper-V Manager chooses for the VMs it creates on your behalf work reasonably well. For those already familiar with Hyper-V, feel free to change values up or down. IMO, reducing values from their defaults doesn’t make too much sense except perhaps for special cases (or underwhelming physical PCs).
For more info on Hyper-V and VMs: Microsoft Learning offers a free 45-minute module entitled “Configure and Manage Hyper-V virtual machines” for those who want more details. Also, there’s a series of tutorials at Windows 11 Forum under its Virtualization heading (54 in all, across a range of VM topics) for those who really want all the minutiae.
Creating VMs with Dev Home (Preview)
When Microsoft released v0.13 of its Dev Home (Preview) developer toolbox on April 23, 2024, I noticed they added support for “Environments” as something new. Microsoft explains that environments provide “… the ability to create, manage, and configure Hyper-V VMs and Microsoft Dev Boxes” (see the GitHub Dev Home Preview v0.13 release notes).
Many readers may be indifferent to Dev Boxes (an Azure service to enhance developer productivity through self-service access to preconfigured, project-oriented development environments in the cloud via Azure, for which a subscription is required). If those readers want to use Hyper-V VMs, however, they should NOT be indifferent to its VM capabilities, which require Windows 11 22H2 or later.
Because I’m only too familiar with the gotchas outlined in the previous section that can impede creation (and use) of VMs through Hyper-V Manager, I wanted to see if Dev Home (Preview) could do any better. I deliberately used an RDP session to run Dev Home on a remote PC. Inside Dev Home, I opened the Environments option, shown with a small blue highlight bar to its left in Figure 24.
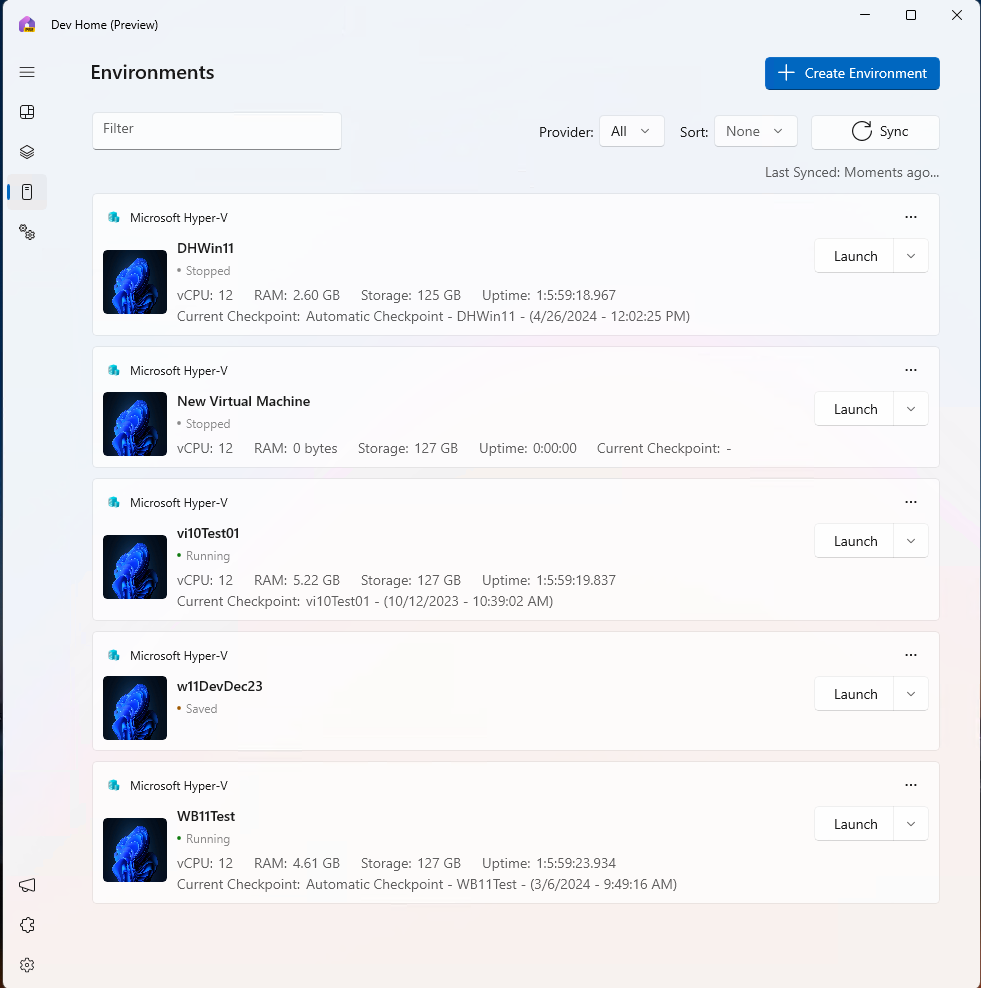
Figure 24: Home Dev Environments shows existing VMs along with “New Virtual Machine.”
Ed Tittel / IDG
Notably, Dev Home brought up all VMs already defined on the P16, and their status (Stopped, Running, Saved); I guess that means they count as “Environments” from the tool’s perspective. More notably, clicking the Create Environment button at the upper right sped me through the steps to create a new Hyper-V VM:
- Select Microsoft Hyper-V as the “environment provider.”
- Enter NewVM2 in the field tagged “New virtual machine name.”
- Select the 30-day evaluation for the “Windows 11 dev environment” as the Windows OS image source (it’s labeled an “Environment” below), purely as a test, as shown in Figure 25.
- Click Create Environment (see lower right, Figure 25).
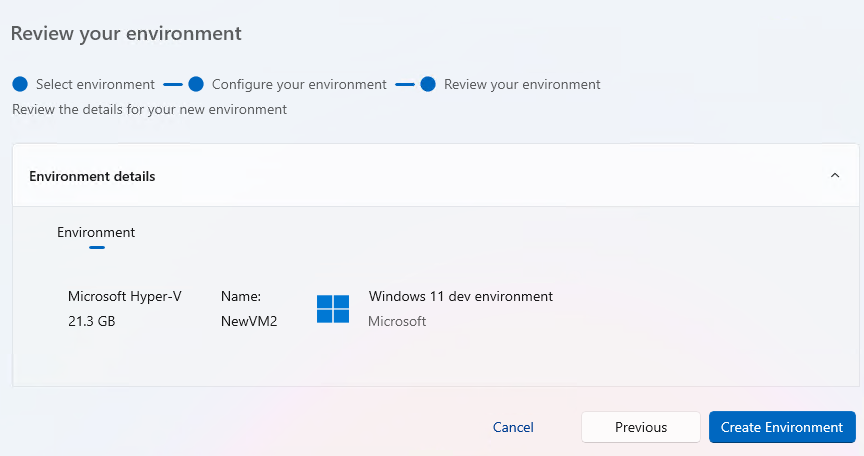
Figure 25: This screen shows you’ve chosen the Microsoft-supplied “Windows 11 dev environment” as your image source for a new VM.
Ed Tittel / IDG
Once you’ve clicked the Create Environment button, be prepared to wait a while. Dev Home must download the Windows 11 dev environment (over 20GB in size), then extract its interior files. On the P16 Mobile Workstation, that took about 15 minutes. Dev Home does report progress during this process, as you can see in Figure 26, which shows the download 76% complete.
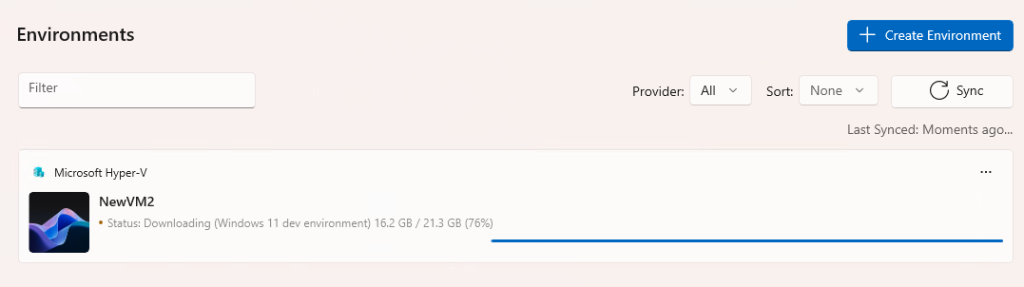
Figure 26: Progress in downloading the ISO for the Windows 11 dev environment stands at 76%.
Ed Tittel / IDG
When the extraction process ends, the ISO is mounted and the VM ready to launch. You’ll see Environment information for your new VM (NewVM2, in this case) like that shown in Figure 27. You must click the Launch button (far right) to start the VM installation process.

Figure 27: Click the Launch button to fire off the Windows installer for the VM’s OS.
Ed Tittel / IDG
When you do that, a small VM window opens to present you with a Start button to fire things off. Figure 28 depicts that VM window: click that Start button!
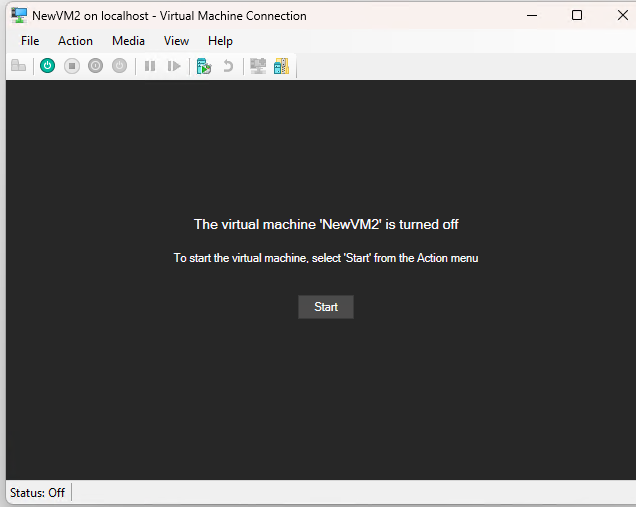
Figure 28: Click the Start button to put Setup.exe to work to install the VM’s OS.
Ed Tittel / IDG
This starts the VM, which fires off the ISO image’s Setup.exe, at which point you’ll see a larger VM window labelled Hyper-V and a circular progress indicator. Then, you’ll be asked to size the VM window for further display (I recommend at least 1680 x 1050). At this point, a login window for a generic “User” (no password) appears, as shown in Figure 29. Remarkably, this took two minutes or less to complete. Click Sign in to get to the desktop.
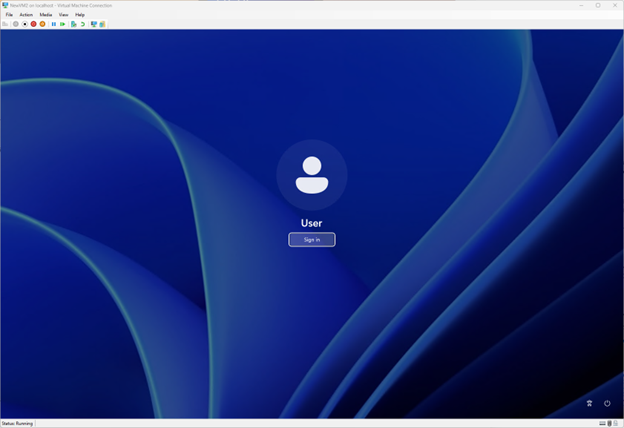
Figure 29: Because the predefined User account requires no password, click “Sign in” and you’re done.
Ed Tittel / IDG
The next thing you’ll see is the NewVM2 desktop, a mostly bare-bones Windows 11 install that also includes Visual Studio 2022 and Ubuntu on Windows. It’s running the current build as I write this for an Enterprise Evaluation (22621.3447) version. I also checked: you cannot use a valid Windows 11 Enterprise key to activate this install (it rejects all keys).
But here we are, having installed a working Hyper-V VM for Windows 11 from start to finish inside an RDP session! Thus, the Dev Home approach completely sidesteps all gotchas one encounters when using Hyper-V manager, to wit:
- There’s no need to stop the VM after its first start, visit its Security settings and check the Enable TPM option as in Hyper-V Manager. Home Dev is smart enough to handle this in the background.
- It starts, installs and boots from inside an enhanced RDP session. No local login is required to start up the VM to run setup.exe for the first time.
- Built-in support for enhanced sessions also fixes the missing login prompt problem once the VM is up and running. There’s no need to tweak sign-in options, either. In fact, the OS doesn’t even show the “Only allow Hello logins” entry under Additional settings in Settings > Accounts > Sign-in options as shown in Figure 4 earlier.
- Because enhanced sessions are turned on by default, you can cut and paste strings from outside the RDP session into the RDP session. That’s how I determined that a valid Windows 11 Enterprise key did not work to re-key the Windows 11 Dev image that Dev Home downloads and uses.
There’s just one problem: Dev Home environments don’t let you grab an arbitrary local ISO on a drive. You can only use Environments that Microsoft makes available (these are essentially the same as the “gallery images” shown in Figure 9 earlier in this story).
For any other Windows images you might want to run as VMs, you must use Hyper-V Manager and its quick or slow create processes — that is, unless Microsoft responds to my feature request to add access to local ISOs to Dev Home’s existing image options when creating a VM.
Net-Net: It really could be easier
What I learned from digging into Dev Home and its capabilities — especially when using RDP — is that it’s entirely possible for Microsoft to update and rationalize its Hyper-V VM creation process. Whether or not they choose to do so is up to them. I certainly hope they’ll figure this out, and do just that.
Ideally, Microsoft would fix Hyper-V Manager to make it Windows 11-aware (and friendly). And then they might add local ISO access to image selection options in Dev Home. Frankly, I’d be happy with either of these approaches (you can always tweak a VM created in Dev Home in Hyper-V Manager through its many Settings categories and options). Although it would be great to see both happen, I’m not holding my breath…